
Pages
Creating Pages
To create a new page:
- Click the "Add Page" link from the Markup Factory Dashboard or near the top of any page in the "Pages" administration area.
- Enter a unique Title for the page
- Select the appropriate Template from the drop-down list
- Enter a unique URL for the file (to learn how to select a good URL, read the Addressing Schema documentation)
- Enter content into the editor window
- Use the "Preview" button to ensure that the page content looks as intended
- Click "OK" or "Apply" to save the page
Updating Pages
You can easily update page content on any page within your website. Sometimes content on your website can be located in a Blog Post or a Calendar event, etc., but if you would like to update a static page, you can find a complete page list of all pages on your website in the Pages module linked in from the Markup Factory Dashboard.
- Select the page you wish to edit from the list of pages by clicking the "edit" link
- Modify the content using the MF Editor
- Click "OK" to save the page and return to the page list or click "Apply" to save the page and continue editing the content
Note: To see the updated content, you can click the "Preview" button or visit the page in a web browser and refresh that page as you make updates.
Page Meta / Head Content
The Meta / Head content tab allows you to set unique content to be included on each page of your site. In order to use this function, you need to include the or {{HeadContent}} tags in your template between the <head></head> tags of your HTML. See the Template Engine documentation page for more details on implementing this.
It is good practice to have a unique description and keywords for each page for best search engine optimization.
If you are using the {{HeadContent}} tag in your template, you can use this to include other items in the head of your document, such as special JavaScript includes, CSS files, and more.
You should use either the MetaData or HeadContent tag, but not both.
Security / Permissions
Using the Security / Permissions tab, you can restrict access to pages to logged in users or only users who are part of a specified group. To restrict access to a page:
- Click on the "Security / Permissions" tab for the page
- Select "Yes" next to the "Restrict Access to Page" option
- Select the groups that you wish to access the page
Any users who are not logged on and who try to access the page will be presented with a user logon form. Once the user successfully authenticates, access will be granted to the page if the user is a member of the specified group.
Using the Editor
Markup Factory utilizes a WYSIWYG (What you see is what you get) editor.
Inserting an image into your content:
To display a photo on your website, the image must be located on a publicly accessible website. You may either upload your image to the Markup Factory servers or use the URL for an image located on a third party server. To insert an image into the body of your content using the Markup Factory editor:
- Place the cursor where you would like the image to be inserted
- Click on the insert image button (
 )
) - To insert an image for which you know the URL, simply input the Image URL and a description for the image and click "insert".
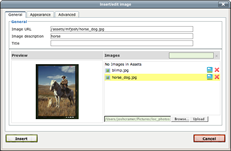 To insert an image which has been previously uploaded to the server, simply select the image from the list. You will see a preview of this image in the preview window.
- To insert an image that is currently on your hard drive, use the upload image dialog to upload the image file. You will be prompted to select the image from your hard drive after clicking the "browse" button. Once you've selected the image, click the "upload" button.
- After the image uploads, select the image from the list of available photos.
- Enter the Image Description, and then click "Insert"
- The image will now be placed within your content
It is usually advantageous to set the alignment of the image before clicking the "Insert" button. You can set the alignment of an image before placing it under the "Appearance" tab.
Editing an Existing Image:
To edit or change an existing image placement, simply select the image with your mouse and click the insert image button (![]() ). You can also right-click on an existing image and choose insert/edit image.
). You can also right-click on an existing image and choose insert/edit image.
Creating a Hyperlink:
A hyperlink is a link to another page or file on your site. You can easily create a hyperlink in your page content using the Markup Factory content editor by following these steps:
- Highlight the text that you would like to make into a hyper link
- Click the link button (
 )
) - In the hyperlink dialog, create a link to the appropriate resource as follows:
- Another Page on Your Site: To link to another page on your website, simply select the page from the "Page List" drop down
- An External Website: type or paste the (URL including the http://) into the "Link URL" field. When linking to an external website, it is usually good practice to select "Open in New Window" from the "Target" drop down. This ensures that visitors do not leave your website to view this page.
- A File on Your Website: Click the browse button (
 ) and select the file that you wish to link to. If this is a new file, you can use the "Upload File" dialog to upload the file to the server before selecting it from the list.
- Click the "Insert" button
- Save the page to make the hyperlink active on your website
Note: There is no need to manually underline hyperlinks - hyperlinks are generally automatically underlined by default website styles in your CSS. If you would like to change the style or color of your hyperlinks, you should do this in your CSS stylesheet and not from within the Markup Factory Editor.
Pasting Content from Microsoft Word or Another Source:
Using the Markup Factory Editor, you can easily paste pre-written content from Microsoft Word or another source into your pages. Unfortunately, content formatting does not normally translate well from Word to the Web. Markup Factory has built-in functions to help you clean up and reformat content before publishing it to the web without having to re-create the content from scratch.
To paste conent from Word, follow these steps:
- Highlight the content in Microsoft Word and copy it to your clip board using Ctrl+C (or Cmd+C for Mac)
- In the MF Editor, place your cursor where you would like the content to be inserted and click the Paste from Word button (
 )
) - Press Ctrl+V (or Cmd+V for Mac) to paste the content into the dialog box
- Click the "Insert" button
- After the content is inserted into the MF Editor, you may need to apply some styling using the editor controls. This is due to the fact that formatting does not translate well from Word to Web.
Note: You may also choose to paste content using the Paste as Text function (![]() ). This function will strip all styling from your content before pasting it into the editor to ensure that the markup is as clean as possible. You can then easily re-add styling to the content using the MF Editor controls.
). This function will strip all styling from your content before pasting it into the editor to ensure that the markup is as clean as possible. You can then easily re-add styling to the content using the MF Editor controls.